

Hardcore Arms Warrior
Viability of the Arms Warrior in Hardcore Classic WoW
While the Arms Warrior in World of Warcraft (WoW) Classic has been popularly known as a PvP powerhouse, its viability in the Hardcore mode of WoW Classic is also considerable. The Hardcore mode, with its emphasis on survival and self-sufficiency, can present certain challenges for Arms Warriors, but with careful planning and play, it is a class that can truly shine.
Damage and Survivability
In terms of raw damage output, Arms Warriors are among the best in the game. Their main ability, Mortal Strike, is an incredibly powerful attack that also reduces the effectiveness of any healing on the target. This makes it highly effective not only in PvP situations but also in PvE content.
In the Hardcore mode, survivability is key. Arms Warriors have a number of tools at their disposal to keep them alive in sticky situations. The Tactical Mastery talent allows for easy stance dancing, giving access to powerful abilities like Shield Wall and Last Stand, which can significantly increase survivability in a pinch.
Moreover, abilities like Overpower and Sweeping Strikes ensure a constant high damage output, helping to quickly bring down enemies. With the right talents and gear, Arms Warriors can also provide significant crowd control, further increasing their survivability.
Solo Leveling
Arms Warriors are very capable when it comes to solo leveling, a key aspect of Hardcore mode. With access to Mail armor from the start, and later Plate at level 40, they have a solid defense. A careful Warrior can use their abilities strategically to take on multiple enemies at once, or to quickly dispatch single targets.
While Warriors generally have limited self-healing abilities, they do have access to abilities like Second Wind and Blood Craze, which can provide a decent amount of health regeneration in combat. Bandages and food will also be a crucial part of maintaining health between battles.
Group Play
Arms Warriors bring considerable value to group play, especially when it comes to dungeons. They can serve as off-tanks if needed, and their high damage output will be greatly appreciated by any group. Arms Warriors can also provide useful debuffs on enemies, further increasing the group's damage.
In a group setting, Warriors are also likely to benefit from the healing and support provided by other classes, improving their longevity and allowing them to focus on dealing damage.
Best Races
Best Races for Arms Warrior in Classic WoW Hardcore
Alliance:
Human: Human Warriors have a distinct advantage in WoW Classic, particularly due to two racial traits: Sword Specialization and Mace Specialization. These passive skills increase your skill with Swords and Maces by 5, which directly increases your hit chance - a crucial stat for Warriors who primarily deal physical damage. Additionally, the Human Spirit increases spirit by 5%, which is beneficial for health regeneration. Lastly, Perception can prove invaluable in PvP situations, as it increases Stealth detection for a short period.
Night Elf: Night Elves have higher base agility than any other Alliance race, providing a small critical hit chance boost - valuable for an Arms Warrior focusing on damage output. Shadowmeld can be useful for surprise attacks in PvP and avoiding unwanted combat in PvE. Quickness provides a 1% increase to dodge chance - a small but useful bonus to overall defense.
Gnome: Gnomes could be an interesting choice for an Arms Warrior, mainly because of their Escape Artist ability, allowing them to escape roots and snares, which Warriors typically struggle against. Additionally, their Expansive Mind racial provides a 5% increase to base Intellect, while not directly beneficial for an Arms Warrior, it can help slightly with the limited mana pool when utilizing some abilities.
Dwarf: Stoneform is the standout racial trait for Dwarves, providing a 10% increase to armor and making the Dwarf immune to bleed, poison, and disease effects for 8 seconds. This can be extremely beneficial in both PvP and PvE situations where these types of debuffs are common. Additionally, their Frost Resistance racial can be useful in encounters with frost damage.
Horde:
Orc: Orcs have several racial abilities that make them a top choice for Warriors. Blood Fury is a strong DPS cooldown, increasing base melee attack power by 25% for 15 seconds, excellent for burst damage. The Hardiness trait, which gives a 25% resistance to stun effects, can provide a significant advantage in many combat scenarios. Lastly, their Axe Specialization racial increases skill with Axes by 5, providing a bonus to hit chance when wielding this type of weapon.
Troll: Trolls make for excellent Arms Warriors due to their Berserking racial ability. Berserking increases your attack speed by 10-30% (depending on your health when you activate it) for 10 seconds, excellent for dealing burst damage. Their Beast Slaying racial also provides a passive 5% damage bonus to beasts, which are common enemies throughout the game.
Tauren: Tauren Warriors have a few useful racial traits. War Stomp is an AoE stun that can act as a lifesaver in challenging combat situations. Endurance increases the health pool by 5%, providing extra survivability - a key asset in Hardcore mode. Their Nature Resistance racial can also be helpful in encounters with nature damage.
Undead: While not the most conventional choice for a Warrior, Undead have some racials that can be useful. Will of the Forsaken removes Charm, Fear, and Sleep effects, and grants immunity to these effects for 5 seconds, providing a significant advantage in specific PvP and PvE situations. Their Cannibalize ability can also be handy for health regeneration after battles, reducing downtime.
Talent Builds
Leveling as Arms
Typically, Arms with a two-handed weapon is the best specialization while leveling (at least until acquiring Thrash Blade). It's possible to reach 60 using any spec, but the one below will provide the easiest journey:
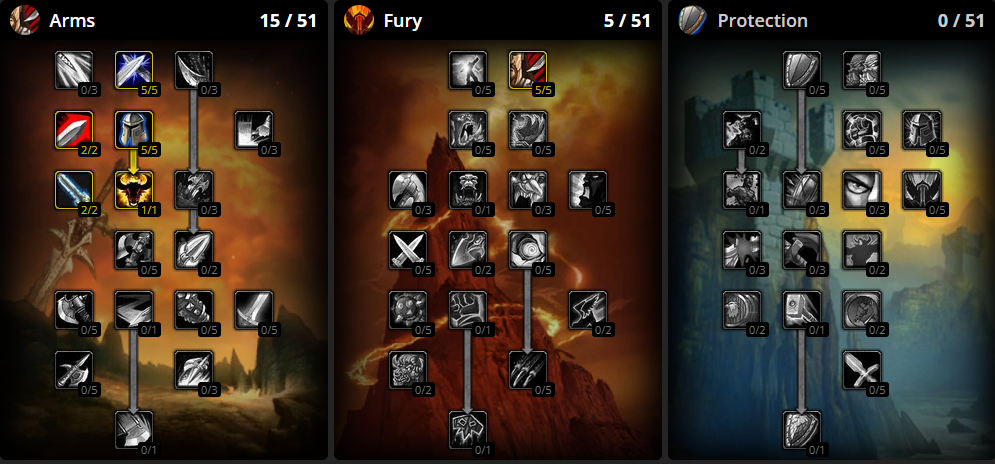
Levels 1-29
Initially, allocate five points into Cruelty, which considerably boosts your DPS. Next, pick up 5/5 Deflection, 5/5 Tactical Mastery, and Anger Management, which allow you to stance dance and increase your rage generation. Then take 2/2 Improved Overpower, providing a massive +50% crit chance to Overpower. Lastly, put the final two points in Improved Charge, taking you to level 29. If you prefer, you can go straight for Improved Overpower and Anger Management in Arms before grabbing Cruelty. All of these talents are potent, and the order in which you acquire them isn't hugely critical.
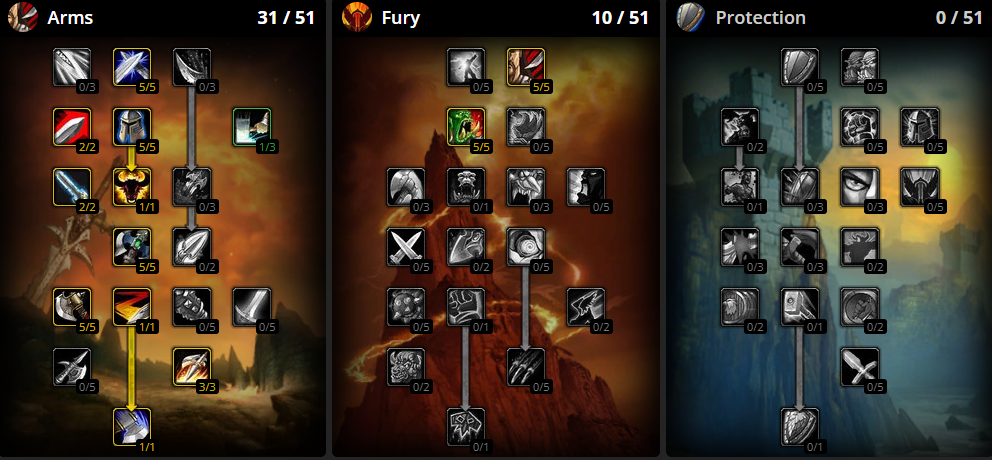
Levels 30-50
At level 30, you can respec fully arms to acquire Sweeping Strikes and set yourself up to get Mortal Strike at 40. After getting Mortal Strike, the next 5 talent points should return to Cruelty. If you prefer, you can wait until 40 to respec instead of 30, which just means you will get Sweeping Strikes at 35 instead of 30, but you will keep Cruelty in the interim.
Levels 51-60
A good fury spec for levels 50-59 looks something like this:
First, work your way up to Bloodthirst in the Fury tree.
Then, switch back to the Arms tree until you reach Anger Management.
Finally, invest the remaining points in the Fury tree for additional filler talents such as Improved Execute.
This spec allows for a more dynamic playstyle with increased rage generation and powerful fury abilities like Bloodthirst. However, it's worth noting that some players still opt to remain in the Arms specialization during this level range.
Remember, talent builds can vary based on personal preference and playstyle. It's important to experiment and find the build that suits you best while considering the specific strengths and weaknesses of each specialization.

Essential Skills and Abilities
Battle Shout
Battle Shout is a crucial boost to dps and should be maintained whenever you're engaged in a battle. Despite its relatively short two-minute duration, the benefits of keeping it active outweigh the effort. It is advisable to cast Battle Shout towards the end of every fight as the remaining rage dissipates, refreshing the two-minute duration without wasting excess rage.
Sunder Armor
Sunder Armor, while seemingly insignificant, actually considerably enhances damage output over the course of a fight by reducing enemy armor. The earlier you cast Sunder Armor in a battle, the more time you have to capitalize on the resulting debuff on your opponent. Sunder Armor should ideally be your initial ability in most fights.
Hamstring
Hamstring is an excellent tool for evading enemies. If you need to escape from a mob, cast Hamstring and then make your getaway. Be sure to stop attacking the mob afterwards to reset it. Consult the 'Advanced Tips' section for more details on managing mobs. In addition, if you have ample rage, Hamstring can be utilized to trigger Overpower procs or Windfury Totem procs in duo situations with a Shaman.
Thunder Clap
Thunder Clap is a defensive move that increases the interval between enemy melee attacks, reducing incoming damage. Additionally, it delivers minor AoE damage. Thunder Clap should be employed in every fight during the early levels, when there is an abundance of rage to spend, as well as in higher level fights where high damage is expected.
Demoralizing Shout
Demoralizing Shout is a defensive technique that reduces enemy attack power, thus lowering the damage you receive. Like Thunder Clap, it should be employed in every fight during the early levels and in higher level fights where high damage is anticipated.
Overpower
Overpower is a proc-dependent skill that can only be activated after an enemy dodges one of your attacks. When paired with the Improved Overpower talent from the Arms tree, it has a significant chance to result in a critical strike. It shares a cooldown with Revenge.
Sweeping Strikes
Sweeping Strikes is an Arms talent that causes your next 5 attacks to also strike a nearby enemy. This ability singlehandedly enables warriors to handle two targets simultaneously and is highly enjoyable to use.
Mortal Strike/Bloodthirst
Mortal Strike and Bloodthirst are the primary abilities from the Arms and Fury trees, respectively. An interesting facet of playing a warrior is that you don't receive your main dps ability until level 40. However, once you obtain it, it significantly changes the game. If you have sufficient rage, these abilities should be utilized as soon as their cooldown expires.
Whirlwind
Whirlwind is an AoE ability based on weapon damage. It should be employed whenever you're fighting more than one target. It can also be used in single target fights prior to obtaining Mortal Strike/Bloodthirst, and can continue to be used afterwards if you have extra rage. Whirlwind pairs exceptionally well with Sweeping Strikes.
Intimidating Shout
Intimidating Shout is an AoE fear effect and serves as a warrior’s primary escape tactic. Take note that active bleeds such as Rend or Deep Wounds can break the fear effect, so avoid these abilities if you intend to rely on Intimidating Shout.
Piercing Howl
Piercing Howl is an AoE slow effect from the Fury tree that can be used as an escape tactic. It lasts for just 6 seconds, but that can be sufficient time to escape from a sticky situation.
Pummel
Pummel is your principal interrupt ability at higher levels. Unlike Shield Bash, it does not require a shield to be equipped for it to be cast. However, it does require Berserker Stance, so speccing into Tactical Mastery for stance dancing makes this ability much more effective.
Core Stance Cooldowns
Each stance has one main cooldown which aligns with the theme of the stance. These abilities all share a 30-minute cooldown.
Retaliation is the Battle Stance ability. It can be used when engaging large packs, allowing the warrior to easily manage pulls that would otherwise be fatal. Note that mobs attacking you from behind will not get hit by Retaliation.
Shield Wall is the Defensive Stance ability, and it's a potent defensive cooldown that can be a lifesaver. Shield Wall requires a shield to be activated.
Recklessness is the Berserker Stance ability, which although powerful, has limited use in Hardcore due to the increased damage taken. It can be a powerful offensive cooldown when fighting a single mob that you need to burst down, but the increased damage taken makes it risky.
Professions
The two top-tier profession combinations for warriors are Herbalism / Alchemy and Mining / Engineering. Alternatively, if you want to try the Self Made achievement, or just want to mix things up, Mining / Blacksmithing is another option, but it's far more labor-intensive and offers fewer benefits.
Herbalism/Alchemy
Alchemy allows you to make your own potions, which provide passive boosts to many stats, including strength, agility, health, and armor. Herbalism/Alchemy provides the most robust passive benefits.
Mining/Engineering
Engineering is useful for three types of items: goggles (e.g., Flying Tiger Goggles), grenades (e.g., Iron Grenade), and target dummies (e.g., Target Dummy). Later in the game, engineering provides a host of fun trinkets. It is also the best profession for end-game raiding.
Mining/Blacksmithing
Blacksmithing is almost required for the Self Made challenge. It can also be a good choice if you are duoing with a paladin who opts to pick up Enchanting. However, blacksmithing is incredibly material-intensive to level and requires a great deal of time and commitment. Be prepared to farm ore extensively.
Securing the Whirlwind Axe in Hardcore Mode
Once you've acquired the Berserker Stance, you are directed to the second phase of this questline, which rewards the Whirlwind Axe. To begin, you'll need to gather:
30x Bloodscalp Tusks
8x Liferoot
1x Essence of the Exile
Bloodscalp Tusks can be obtained from Bloodscalp Trolls in Stranglethorn Vale. It's important to note that you need to have the quest in order to loot these items. This isn't the case with other items. If you are an Herbalist, you can gather Liferoot; otherwise, it can be looted from Kurzen Medicine Men. Essence of the Exile is produced by combining 8x Burning Charm, 8x Thundering Charm, and 8x Cresting Charm, which can be collected from elementals in Arathi Highlands. Acquiring these charms is perhaps the most challenging and perilous part of this questline, given the high level (38-39) and damage output of the elementals.
After assembling all of the materials mentioned above, proceed to Bath’rah the Windwatcher in the Alterac Mountains (up the river from Hillsbrad Foothills) and brace yourself for a fight against Cyclonian. Cyclonian is a formidable elite elemental with considerable damage capacity and various abilities. There are two main strategies for safely defeating Cyclonian.
The first strategy involves Alchemy: brew 2x Nature Protection Potions. You can consume one before the fight, wait two minutes, start the battle, and then consume the other one when the first one runs out. I utilized this strategy at level 38, and the first potion wasn't even fully depleted during the encounter with Cyclonian.
Two-Handed Weapon or Dual Wielding?
Throughout most of your leveling journey, wielding a two-handed weapon typically outperforms dual wielding, assuming the weapons are of comparable quality. Dual wielding tends to fall short for a couple of key reasons:
The offhand weapon suffers a 50% DPS (Damage Per Second) reduction, meaning it only delivers half of its listed damage.
Offhand weapons face a considerable miss penalty. This additional miss rate means your offhand weapon's damage will be significantly lower than the 50% DPS limitation. The lack of +hit gear prior to level 60 makes dual wielding less viable. Moreover, high-level abilities like Mortal Strike, Whirlwind, and Sweeping Strikes, which rely on weapon damage, are generally more effective with two-handers than with one-handers (Sweeping Strikes, while not explicitly based on weapon damage, is limited to 5 charges, meaning the more damage you deal per hit, the more you gain from this ability, favoring two-handers).
There are, however, circumstances where dual wielding can outperform two-handed DPS. One such situation is when your two-handed weapon becomes outclassed due to leveling up, and you obtain a new, superior one-hander. If this one-hander can deal nearly as much damage as your two-hander on its own, it might be worth transitioning to dual wielding until you upgrade your two-handed weapon.
Another situation arises once you complete Maraudon (around level 50) and acquire the Thrash Blade. This decision is subjective, but obtaining Thrash Blade could motivate you to respec to fury and adopt dual wielding (perhaps with Vanquisher's Sword from Razorfen Downs) until you reach level 60.
Dungeon Tanking as an Arms Warrior
Warriors make exceptional dungeon tanks in Hardcore mode, and acquiring tanking skills will also reduce the time you spend searching for dungeon groups. Moreover, poor tanking/pulling is often the primary cause of group wipes in dungeons. By mastering tanking and pulling techniques, you can enhance the success rate of your dungeon runs. As a tank, you lead the dungeon group, deciding what and when to pull, what strategies to employ, and when to utilize various crowd control (CC) measures. Effective communication with your group is crucial, keeping them informed about what you're doing, when, and what you need from them.
Being overleveled is critical for undertaking Hardcore dungeons and is especially vital for tanks. It's preferable to attempt dungeons at the higher end of the level range, where you'll deal more damage/threat, sustain less damage, and have a lower chance of unintentionally aggroing mobs.
It's possible to tank all dungeons in arms spec, eliminating the need to respec for dungeon runs. When tanking, switch to Defensive Stance to decrease incoming damage by 10% and increase threat generation by 10%. Your primary goal is not to maximize damage but to maintain threat on as many mobs as possible while surviving. Use Sunder Armor and Revenge to generate threat, and use Demoralizing Shout and Disarm to reduce incoming damage. Shield Block can be employed to mitigate incoming damage, particularly from hard-hitting bosses. Thunder Clap can also be used if desired, but it requires Battle Stance, making it potentially more trouble than it's worth.
Most mobs and bosses can be handled using your regular two-handed weapon. For larger pulls or bosses dealing significant damage, don't forget to equip a shield. Do your homework on each dungeon beforehand, learning each boss's abilities and deciding which ones warrant a shield (like Verdan the Everliving in Wailing Caverns).
When pulling mobs, opt for ranged weapons unless you're certain that Charge is entirely safe to use. This means ensuring you won't attract additional mobs, won't be feared into other packs, and will maintain Line of Sight (LoS) with your healer. When pulling caster mobs at range, disrupt their Line of Sight after the initial pull, forcing them to stop casting and approach you.
Finally, warriors possess three taunt abilities, each functioning differently. Taunt serves as your primary taunt ability, but it can be resisted. When successful, Taunt compels the target to attack you for 3 seconds, and raises your threat to match the current highest threat target. Taunt does not generate additional threat if you're already first in threat, so it should be used only when you lose threat on a mob. If Taunt fails, you can switch to Battle Stance to use Mocking Blow, which forces a target to attack you for 6 seconds, but lacks a threat-matching component. Consequently, unless you reach top threat within those six seconds, the mob will return to attacking its previous target. The third ability is Challenging Shout, an AoE taunt that functions similarly to Mocking Blow. Ensure you equip a shield when using Challenging Shout and maintain good communication with your healer—you should expect to sustain substantial damage.